

Buying guide
How to Set Up Mesh Wi-Fi
Place Nodes, Choose Modes and Verify
Set up mesh Wi-Fi with the right router or AP mode, sensible node placement and a room-by-room check. Includes eero and ASUS instructions and a gift checklist.
By thisPING EditorialUpdated November 3, 20269 min read1 pick
On this page · Quick picks and setup comparison
Connect the first mesh unit to your internet equipment, choose the supported router or access point arrangement, then add and position the remaining nodes using the maker's instructions. Verify the node links and a real device in each important room before calling setup finished. If you're still choosing hardware, eero Pro 7 is our app-led pick; ASUS ZenWiFi BT10 is the alternative for a documented AiMesh/AP-mode arrangement.
Quick picks and setup comparison
Already own a kit? Keep it if it meets your needs; use its exact model instructions below.
Compare specifications and all conditions
eero Pro 7
- Our recommendation
- App-led installation
- Setup and mode
- eero app; router or bridge arrangement
- Ethernet per unit
- Two auto-sensing 5 GbE ports
All specifications
- Variant to check
- Single router, 2-pack or 3-pack
ASUS ZenWiFi BT10
- Our recommendation
- AiMesh behind a retained router
- Setup and mode
- ASUS Router app; router, AP and AiMesh node modes listed
- Ethernet per unit
- One 10G WAN/LAN, one 10G LAN, one 1G WAN/LAN
All specifications
- Variant to check
- BT10(W-1-PK), BT10(W-2-PK) or BT10(W-3-PK)
Cable Matters 160001
- Our recommendation
- Optional indoor Ethernet lead
- Setup and mode
- Unshielded Cat6 patch cable; RJ45 connectors
- Ethernet per unit
- Cable, not a mesh unit
All specifications
- Variant to check
- Measure the route and select the length and quantity
Full comparison table
Swipe to compare. Row labels stay visible.
| Option | Our recommendation | Setup and mode | Ethernet per unit | Variant to check |
|---|---|---|---|---|
| eero Pro 7 | App-led installation | eero app; router or bridge arrangement | Two auto-sensing 5 GbE ports | Single router, 2-pack or 3-pack |
| ASUS ZenWiFi BT10 | AiMesh behind a retained router | ASUS Router app; router, AP and AiMesh node modes listed | One 10G WAN/LAN, one 10G LAN, one 1G WAN/LAN | BT10(W-1-PK), BT10(W-2-PK) or BT10(W-3-PK) |
| Cable Matters 160001 | Optional indoor Ethernet lead | Unshielded Cat6 patch cable; RJ45 connectors | Cable, not a mesh unit | Measure the route and select the length and quantity |
Scroll horizontally to see every column
| Option | Our recommendation | Setup and mode | Ethernet per unit | Variant to check |
|---|---|---|---|---|
| eero Pro 7 | App-led installation | eero app; router or bridge arrangement | Two auto-sensing 5 GbE ports | Single router, 2-pack or 3-pack |
| ASUS ZenWiFi BT10 | AiMesh behind a retained router | ASUS Router app; router, AP and AiMesh node modes listed | One 10G WAN/LAN, one 10G LAN, one 1G WAN/LAN | BT10(W-1-PK), BT10(W-2-PK) or BT10(W-3-PK) |
| Cable Matters 160001 | Optional indoor Ethernet lead | Unshielded Cat6 patch cable; RJ45 connectors | Cable, not a mesh unit | Measure the route and select the length and quantity |
Sources: eero hardware, eero packs, eero bridge mode, BT10 specifications and Cable Matters specifications.
Before unplugging anything
Photograph the existing connections and record which box currently routes the network. Keep the old equipment available until the replacement works.
For eero, prepare its app on iOS 15 or later or Android 9.0 or later, power, Ethernet and an active internet connection. Its account uses a verified phone number or email; the maker recommends verifying both for recovery. Let the eventual household administrator own that account. Requirements, account access.
Check your provider's requirements before removing its gateway. eero's ISP settings guide documents configurations including PPPoE, static IP and VLAN tagging; obtain the required credentials or settings from your provider rather than guessing.
No mobile data? eero documents initial setup through the existing router and Wi-Fi. For a separate modem/router installation, it then directs you to power-cycle the modem before connecting eero directly. This is an onboarding workaround; still complete your chosen final arrangement.
Prepare
Record the old connections, account access and provider requirements.
Bring the gateway online
Follow your exact model's setup instructions and confirm internet access.
Add and place nodes
Join them to the same mesh, then check their links in the intended locations.
Verify and hand over
Record room results and confirm the household can administer the network.
Choose which box routes the network
Our default: keep one routing gateway in the finished installation. ASUS explains that placing routers in series can create double NAT and prevent devices on the separated networks communicating; AP mode avoids that arrangement. ASUS explanation.
Standalone modem or an ONT handoff your provider permits
- Finished arrangement to aim for
- Mesh gateway in router mode
- What to confirm
- Exact provider connection settings
Combined modem/router with a supported bridge option
- Finished arrangement to aim for
- Upstream gateway bridged; mesh routes
- What to confirm
- Provider-specific bridge instructions; eero says to set up its network first
Router you intend to retain
- Finished arrangement to aim for
- Existing router routes; mesh uses supported AP/bridge mode
- What to confirm
- ASUS AP mode needs upstream DHCP; eero bridge mode retains its gateway topology
Full comparison table
Swipe to compare. Row labels stay visible.
| Existing equipment | Finished arrangement to aim for | What to confirm |
|---|---|---|
| Standalone modem or an ONT handoff your provider permits | Mesh gateway in router mode | Exact provider connection settings |
| Combined modem/router with a supported bridge option | Upstream gateway bridged; mesh routes | Provider-specific bridge instructions; eero says to set up its network first |
| Router you intend to retain | Existing router routes; mesh uses supported AP/bridge mode | ASUS AP mode needs upstream DHCP; eero bridge mode retains its gateway topology |
Scroll horizontally to see every column
| Existing equipment | Finished arrangement to aim for | What to confirm |
|---|---|---|
| Standalone modem or an ONT handoff your provider permits | Mesh gateway in router mode | Exact provider connection settings |
| Combined modem/router with a supported bridge option | Upstream gateway bridged; mesh routes | Provider-specific bridge instructions; eero says to set up its network first |
| Router you intend to retain | Existing router routes; mesh uses supported AP/bridge mode | ASUS AP mode needs upstream DHCP; eero bridge mode retains its gateway topology |
Follow the provider's exact instructions: eero says gateway bridge procedures vary by ISP and device. Its mesh bridge instructions explicitly allow temporary double NAT during initial onboarding, followed by Settings → Advanced networking → DHCP & NAT → Bridge.
For ASUS, follow its AiMesh AP-mode procedure, which requires a working DHCP server on the upstream router; BT10 explicitly lists AP mode. For retained ISP equipment with bridged eero, turn off the ISP Wi-Fi as directed.
Bring the first unit online, then add nodes
eero: follow the current setup sequence: connect the gateway by Ethernet to the modem, ONT or modem/router, power the equipment as directed, and follow the app registration prompts. Name the location and create the Wi-Fi network. eero allows reusing your previous Wi-Fi name and password; some devices may still need reconnection.
Once the gateway is online, select Add another eero in the setup flow. An Ethernet-equipped eero is required as the gateway; portless extenders cannot fill that role.
ASUS: start at the BT10 manuals page for the exact pack, plus the ZenWiFi setup walkthrough. The latter illustrates XT8, so use the BT10 manual for hardware-specific details. ASUS recommends current firmware and initial pairing about 1–3 meters apart, then relocation. Its Android app guide uses Add Node → Get Started after the main router is configured.
For an existing ASUS node, check firmware and default-state requirements in those instructions before resetting it. Do not reset the household's working router as a routine preparation step.
Place nodes where they can reach the mesh
Put a wireless node between the working mesh and the weak area. eero advises against putting it directly in a dead zone, in a cabinet or behind large furniture; its placement guide also recommends a stable, raised surface and fewer substantial barriers.
For eero, the maker's starting recommendation is 20–30 feet apart, no more than 50 feet. Treat this as placement guidance, not a coverage guarantee: the same guide says layout, brick, stone and metal affect the result. ASUS likewise recommends elevated, open locations between the router and dead zone.
Name each node by room. Check its connection after moving it before placing the next one. If the available socket forces a node behind an appliance or beyond a reliable mesh link, reconsider that location before adding hardware.
Confirm the final uplink
Backhaul is the connection carrying traffic from a node toward the gateway. eero supports wireless or Ethernet backhaul on units with Ethernet ports. For its router arrangement, the documented order is modem → gateway eero → switch → additional eeros; a switch must be downstream of the gateway. Even in bridge mode, eero says connections must funnel through a gateway eero. Wiring, bridge topology.
For ASUS, use its mode-specific Ethernet-backhaul layouts. Avoid transferring an eero wiring rule to another brand. The Ethernet cable guide covers cable selection; this commissioning check is simply to confirm the intended uplink is actually active.
On eero's Home screen, a node's Wired symbol means Ethernet to the gateway directly or through a switch; Wireless means wireless mesh. Tap its nickname for mesh connection strength. Keep this separate from the phone's own Wi-Fi signal reading. Node status explained.
Verify each room and keep the results
Check the internet handoff and room connection separately. eero's app speed test measures the gateway-to-internet connection; it does not measure your phone's Wi-Fi speed, and moving rooms does not change what that test measures. Use a device-based speed test for the room check. eero explains the distinction.
Use the same device and test service for your first pass, with mobile data off so the room check uses Wi-Fi. At each location, record the connected node and band where available, run the test, then try the room's actual job: a work call, streaming or the household printer. These are suggested acceptance checks, not measured performance claims.
Gateway internet test
- Device / connected node / band
- App test, separate from room Wi-Fi
- Node uplink and signal
- Record gateway status
- Download / upload
- Fill in
All specifications
- Actual task result
- Internet available?
Work desk
- Device / connected node / band
- Fill in
- Node uplink and signal
- Fill in
- Download / upload
- Fill in
All specifications
- Actual task result
- Call usable?
Main viewing room
- Device / connected node / band
- Fill in
- Node uplink and signal
- Fill in
- Download / upload
- Fill in
All specifications
- Actual task result
- Stream usable?
Previously weak area
- Device / connected node / band
- Fill in
- Node uplink and signal
- Fill in
- Download / upload
- Fill in
All specifications
- Actual task result
- Intended task usable?
Full comparison table
Swipe to compare. Row labels stay visible.
| Room or checkpoint | Device / connected node / band | Node uplink and signal | Download / upload | Actual task result |
|---|---|---|---|---|
| Gateway internet test | App test, separate from room Wi-Fi | Record gateway status | Fill in | Internet available? |
| Work desk | Fill in | Fill in | Fill in | Call usable? |
| Main viewing room | Fill in | Fill in | Fill in | Stream usable? |
| Previously weak area | Fill in | Fill in | Fill in | Intended task usable? |
Scroll horizontally to see every column
| Room or checkpoint | Device / connected node / band | Node uplink and signal | Download / upload | Actual task result |
|---|---|---|---|---|
| Gateway internet test | App test, separate from room Wi-Fi | Record gateway status | Fill in | Internet available? |
| Work desk | Fill in | Fill in | Fill in | Call usable? |
| Main viewing room | Fill in | Fill in | Fill in | Stream usable? |
| Previously weak area | Fill in | Fill in | Fill in | Intended task usable? |
The eero Devices tab shows a client's connected eero, Wi-Fi band and connection details. ASUS documents wired/Wi-Fi status and client connection quality, with features varying by firmware and model. If a location fails your task check, save the result, move the relevant node and repeat. Keep the earlier result for comparison; do not assume the pack's advertised area establishes success.
Finish available firmware updates before the final pass. eero warns updates reboot units and briefly interrupt service, so schedule them away from important calls.
App-led pick: eero Pro 7
Choose this for eero's app-guided workflow. The Pro 7 hardware page lists tri-band Wi-Fi 7 and two auto-sensing 5 GbE ports; the gateway's internet connection consumes a port, so plan a downstream switch for additional wired connections.
Variant trap: the card represents a single router. eero also sells 2- and 3-packs; select the actual quantity separately. Its support prose claims 2,000 sq ft per unit, while the same page's hardware table says 2,500 sq ft. We flag that conflict rather than using either figure to promise a pack will cover your home. eero also warns mixing older generations may reduce performance.
AP-mode alternative: ASUS ZenWiFi BT10
Choose BT10 when its documented AP/AiMesh arrangement fits the router you want to retain. Its specifications list router, AP and AiMesh node modes. Select the 1-, 2- or 3-pack suffix explicitly; one unit is not a multi-location kit. AiMesh requires compatible ASUS routers; it cannot form an AiMesh with another brand's nodes. Compatibility.
Optional cable pick: Cable Matters 160001
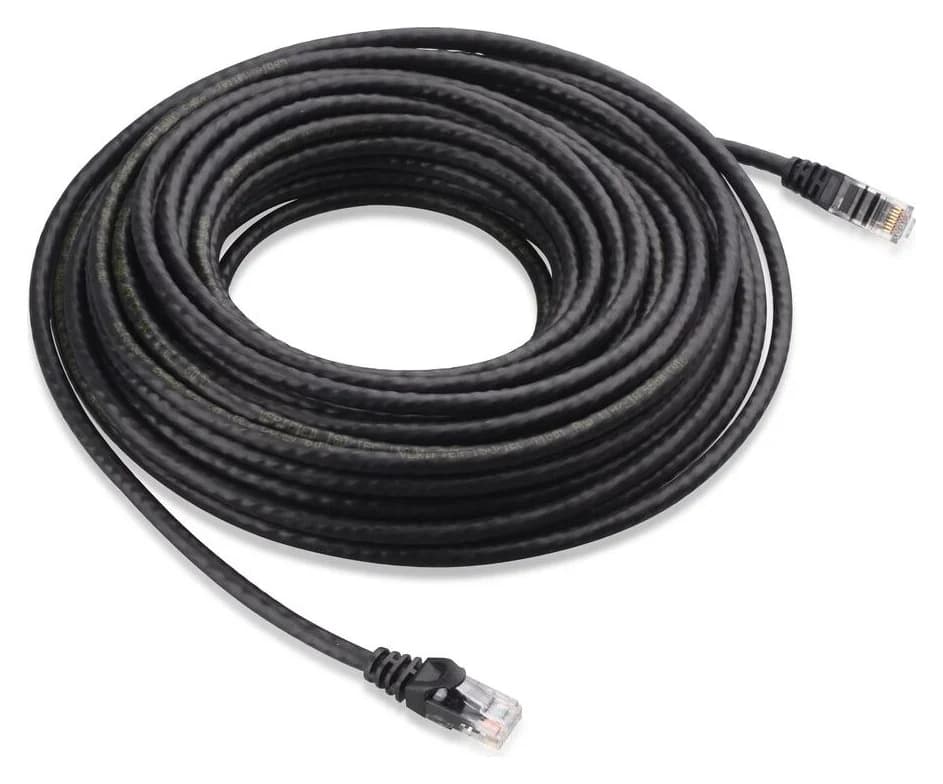
Cable Matters
An indoor unshielded Cat6 Ethernet patch cable with bare-copper conductors and snagless boots.
Check package and model options
Use this for an indoor patch connection if the included cable does not suit your route. The card is the black, 7 ft single-pack; select a different length if your route needs it. Cable Matters specifies bare-copper conductors, unshielded Cat6 construction and RJ45 connectors. The maker requires appropriately rated cables for outdoor or burial use; this indoor lead is not that product.
Buying guide: pack size and household handover
Mark the gateway, proposed node locations, sockets and available Ethernet on a floor-plan sketch before choosing a pack. Our recommendation is to buy for usable locations and verify the important rooms, rather than multiply a coverage claim by the unit count. For broader model selection, use best mesh Wi-Fi systems and eero 7 vs Pro 7 vs Max 7.
For a gift, agree on installation and administration before ordering. Use this handover checklist:
- Yes: Recipient can access the setup account and recovery method
- Yes: Exact model, region, pack quantity and power equipment checked
- Yes: Provider settings and final routing mode recorded
- Yes: Node locations and room results saved
- Yes: Household devices reconnected and administrator can open settings
- Partly: Installation date agreed around work, guests and firmware updates
How we choose
This is a document-based setup guide, not a report of physical testing. Sources are the makers' product specifications and support instructions; hardware choices follow the documented management and mode options. The worksheet is our suggested verification method. Security support also matters: eero lists Pro 7 updates through at least October 31, 2031, or five years after a new purchase directly from eero or Amazon if later; purchases elsewhere receive at least the listed date. ASUS's EOL list identifies models no longer manufactured or updated; check it before reusing older AiMesh hardware.
Verdict
Bring the gateway online first, finish the chosen routing arrangement, then check node uplinks and real household devices before handover. Choose eero Pro 7 for its app-led setup, or BT10 for the documented ASUS AP/AiMesh path. Let the room worksheet determine whether placement is successful.
Our picks at a glance
- 1
Choose for: Optional indoor Ethernet lead
Check before buying: Cat6 does not provide the full 100 m 10G application of Cat6A
Frequently asked questions
Can I connect mesh Wi-Fi to my existing router?
Yes, with a supported arrangement. ASUS documents AiMesh in access point mode behind a router that supplies DHCP addresses. eero can run in bridge mode behind your existing router, but it loses some advanced features and still requires connections to funnel through a gateway eero. Choose the documented mode before finalizing your cabling.
Do mesh Wi-Fi nodes need Ethernet cables?
The gateway eero needs an Ethernet connection to the internet equipment. Additional Ethernet-equipped eeros can connect wirelessly or use Ethernet backhaul. ASUS also documents wired and wireless AiMesh arrangements. Check the exact kit: eero says its portless extenders can only join wirelessly, so an extender-only unit cannot serve as its gateway.
How far apart should I place mesh Wi-Fi nodes?
Use the maker's instructions as a starting point. eero recommends 20 to 30 feet apart, with no more than 50 feet between units, while emphasizing that layout and construction materials change the result. ASUS recommends keeping AiMesh units about 1–3 meters apart during initial setup, then relocating them. Those are different stages, not conflicting final-placement rules.
Can I keep my old Wi-Fi name and password?
For eero, yes: its setup guide says many devices can reconnect automatically when you reuse the previous Wi-Fi name and password. Some may need Wi-Fi toggled off and on or a reboot. Keep a list of household devices and confirm each reconnects before considering the installation finished; automatic reconnection is not a substitute for that check.
Related guides
Comparison · Mesh Wi-Fi Systems
eero Pro 7 vs ASUS ZenWiFi BT10: Simple Mesh or Local Controls?
Choose eero Pro 7 for app-led mesh or ASUS ZenWiFi BT10 for local controls. Compare equal packs, subscriptions, spare ports and complete wired-backhaul orders.
Comparison · Mesh Wi-Fi Systems
ASUS ZenWiFi BQ16 Pro vs BT10: Which Mesh Pack Fits Your Wiring?
Choose ASUS ZenWiFi BQ16 Pro or BT10 for your wiring: compare US packs, radio bands, ports left after backhaul, AiMesh limits and the kit you need to order.
Comparison · Mesh Wi-Fi Systems
eero Max 7 vs Deco BE85: Which 10G Mesh Kit Should You Buy?
Choose eero Max 7 or Deco BE85 by US revision, equal node counts, ports left after 10G backhaul, subscriptions and the cables needed for a complete mesh kit.